Artist Elaine Luther has a pretty good page on how to build a FLAG or where to buy one if you’re not handy.
There’s also a nice step-by-step guide here for a specific design I like.
Here are construction photos from an elegant-looking gallery in Calaveras, CA.
In addition, I have the following thoughts.
Differences between LFL and FLAG requirements
Many people just use a Little Free Library (LFL) design, which one can buy ready-made or as a kit.
I think the needs of a FLAG are different enough that we need to rethink that layout. Books, displayed spine out, are deep. They need floor/shelf space. If there are shelves, the shelf needs to be deep and support a fair bit of weight. At least one shelf must be tall enough to allow tallish books. There’s no need for the back wall to be well lit — so it isn’t.
FLAGs, on the other hand, need wall space. Tiny artworks are best viewed face-on, not edge-on. Some FLAGs put rails on the walls, and many use little easels to display art, but rails aren’t adjustable and if you fill the floor with easels, it blocks visitors’ view of the works in back, and makes accessing those works difficult. Easels tend to go walkabout. The railings and/or easels fill up fast, sometimes resulting in the floor being covered in a drift of drawings that one must pick up to view what’s underneath.
To keep the art in good condition, it’s best if people can view it without touching.
Hanging art on the walls
If you visit a full-size art gallery, you won’t generally find paintings on stands — they hang on the walls, or sometimes on partitions in the middle of the room. If you want your FLAG to resemble a regular art gallery, don’t use little easels — instead, make maximal use of wall space.
To hang mini paintings on walls, paint the walls with magnetic paint, available at the local DIY (or use a metal cabinet). Leave cheap “push pin” magnets stuck to the walls so people can hang up their own work. Pieces too thick for magnets can rest on top of the magnets, or on a bit of Scrabble tray or similar shaped molding with magnets glued to the back.

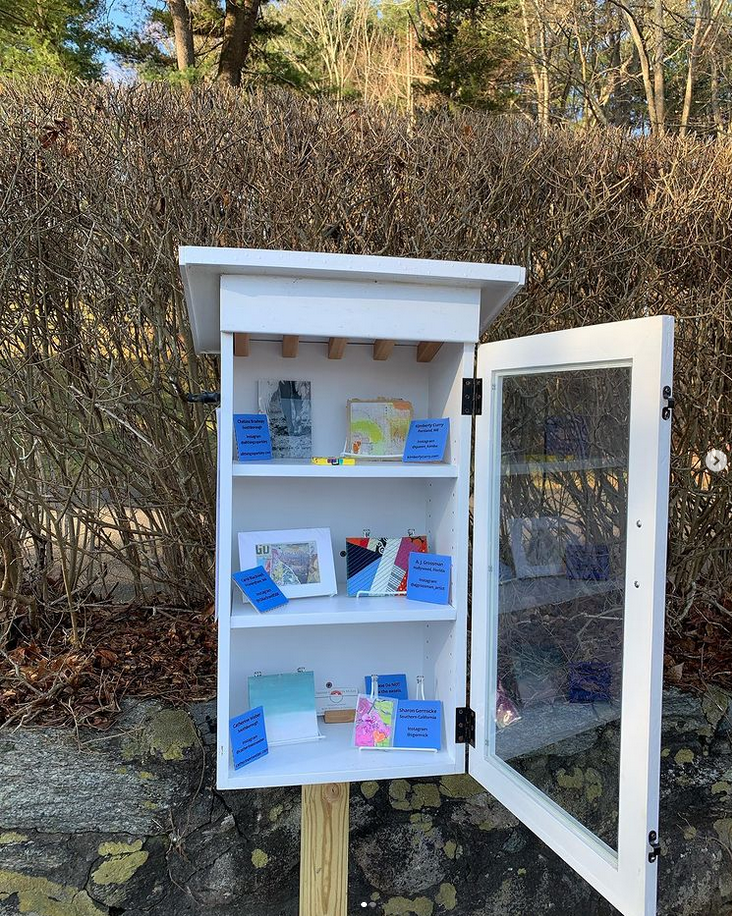
On occasion, people will leave art that’s best displayed by hanging it from the ceiling. Pendants, tiny mobiles, etc. To accommodate those, it’s nice to have a few cuphooks on the bottoms of a shelf, such as was not done in the photo here.
Shape of the cabinet
One difference between a FLAG and a full-size gallery is people can’t walk around inside — there’s a limited range of viewing angles. You can put pictures on the side walls, but if the gallery is deep, the angle can be awkward and the far recesses poorly lit.
That’s why I suggest to make a FLAG tall, wide, and shallow. It might have shelves, giving it multiple “stories” to place 3D works, doll furniture and visitor spectators (I’ve even seen one gallery with a spiral staircase between floors). Partitions at right angles to the back wall let you hang more art. Because visitors can move around in front of the gallery and view it from different angles, the art on these partitions can be seen at less of an angle than something tucked away in a corner of a deeper cabinet.
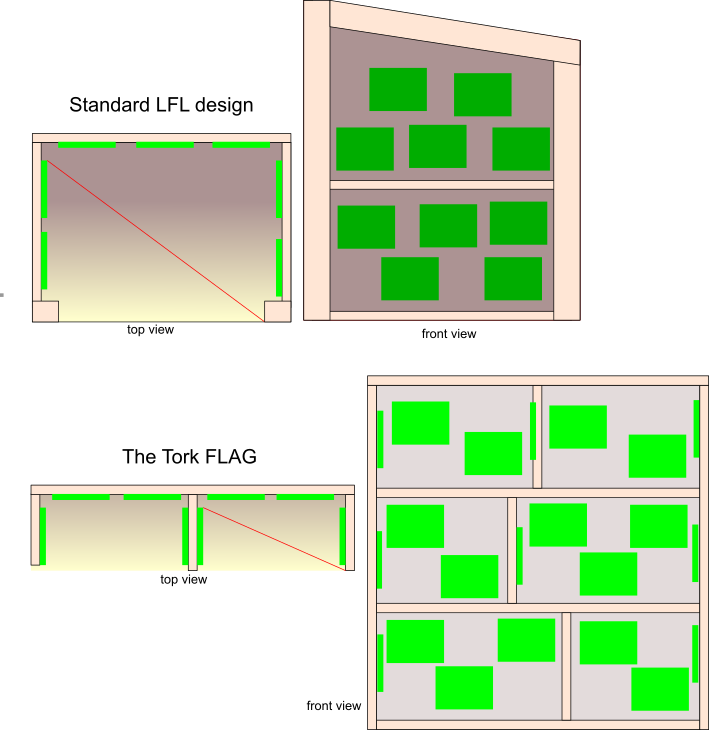
The above image compares a top and front view of a typical LFL design versus my proposed FLAG design. The FLAG is a taller, wider, and shallower. The new design has these advantages:
- There’s more wall space for hanging art.
- The lesser depth means the the back wall is better lit and the art on side walls can be viewed more nearly front-on (red slanted line).
- It’s easier to reach in to add or remove art without knocking things down.
- I prefer to do away with the heavy frame around the opening so the visitor can see everything without opening the door (I’m assuming there’s a window in the door).
- There’s space for sculptures or other items on the floor.
- Because the back wall isn’t a stretch to reach, you can access it without knocking things over.
Size
This depends on your location. A FLAG should be large enough to fit a variety of works at once, but not so large that it looks empty because you can’t get enough art to fill it. A mostly empty FLAG doesn’t have a fun vibe to encourage participation.
It’s a challenge to figure out how large a FLAG a given location can support. Considerations include the amount of foot traffic, the number of kids in the neighborhood, the character of the area (do you have the sort of neighbors who’ll play), and how effectively you get the word out.
If unsure, it’s probably better to err on the side of slightly smaller. If you find yourself receiving more art than you have room to display, remove and store some as a buffer for lean times, or collect enough to build an annex, or deploy FLAG Mark 2, larger, improved.
Supplies area
Especially if you’re in an area where your neighbors may not have ready access to art supplies, it makes sense to designate part of your gallery as an art supply exchange area. Add signage encouraging people to take these items and create something to return to the gallery. You can pick up a variety of items inexpensively at thrift stores, or purchase large sheets of material and cut them into mini-gallery sizes. Your visitors will also leave supplies.
In choosing what to stock here, be attentive to what sort of art people contribute. Besides paper, markers, paint, etc, consider pipe cleaners, polymer clay, plinths for sculptures, popsicle sticks, shrinky-dink sheets, ….
Exhibit area
You might want to have a separate locking area of the gallery for display only, where you can do a single-artist or themed show, with pieces for sale or just for looking. This helps publicize local artists, and can entertain and inspire visitors.
I may write a separate article about how to conduct sales in the exhibit space, but first I need to interview some people who do that to see what they’ve learned.
Weatherproofing
Considerations here are similar to LFLs. We don’t want precipitation or condensation in the cabinet. LFL designs, such as this one, basically don’t worry much about it, depending on the overhang of the roof, the fact that the books tend to be well back from the door, and I don’t know what — the mercy of God? — to prevent the books getting water damage. But artworks might be closer to the door — especially if you use my proposed design above — and are probably more susceptible to curling or other damage that wouldn’t affect a book noticeably. My FLAG operator pals tell me a little soft weatherstripping around the inside of the door keeps water out pretty effectively. A generous overhang in front, and attention paid to what direction weather generally blows in from, may be sufficient for the rest. I also suggest giving a slight tilt to the floor to let water run out if it does get in.
Comments welcome, if you have experience or other tips on the subject!
A FLAG has an additional weather concern that’s less an issue with LFLs — sunlight. Ultraviolet light from the sun can fade artwork. For an active FLAG this might not be a consideration, because things won’t stay in there long. But intense sunlight can cause other damage; if there are glass sculptures inside, they could potentially concentrate the light like a lens and start a fire. It can also get pretty hot inside due to greenhouse effect, which may damage some works.
Again, choice of site matters. If there’s a shady spot to plant your FLAG, go for it. Broad, light colored roofs help in the middle of the day. Maybe consider angling the FLAG so that when the sun is shining on it, it’s at least not beaming straight into the window.
Use plexiglass, not glass, for the window. Plexiglass cuts out a fair bit of UV light, reducing fading. Two layers of plexiglass reduces it even more. There are also window films available at the DIY, which people use to prevent fading of artworks indoors near windows.
I suggest using plexiglass for safety reasons also. Kids may break a glass window and cut themselves.
Placement
The weatherproofing section contained some discussion of how to position a FLAG for protection from the elements. Safety and accessibility are also considerations for placement.
Avoid positioning a FLAG so people have to stand in the road to access it. Near a sidewalk is good — unless crazy cyclists tend to use that walk and may collide with your patrons. To avoid foot traffic creating a bare spot on your lawn or tracking up muddy ground, decorative stepping stones or interlocking plastic pavers provide a good place for people to stand.
Some of your patrons may not be able to reach very high. What’s eye level for an average standing adult, is too high for a lot of children and also for people in wheelchairs. Accessibility guidelines for door handles say they should be a max of 48″ above the ground, so that’s probably a good height for the highest artwork in the gallery. I debated whether to suggest a step that short humans could stand on. That might work provided it sticks out enough from the front of the gallery that people don’t have to lean back while standing on it.
If your street isn’t one where people walk much, it’s unlikely to get much traffic. Some of the more successful galleries are located in business areas where there are lots of pedestrians, or on walking paths. If you operate a compatible business, or can talk a business owner into it, the business can sponsor the gallery and it can be just outside their store — or inside, which simplifies weatherproofing. You can suggest to people who want to contribute art that they can hand it in at the counter inside, where it can be photographed and posted online before being added to the gallery. Otherwise, you’d fail to record some contributions if they’re added and removed before you get to see them.
To make the exchange aspect work, situate the gallery where there’s a lot of returning foot traffic. A gallery in a busy tourist spot will get a lot of visitors, but they won’t have anything to contribute — they can only take. If people pass your gallery on their daily walk, they’ll see the contents change from day to day, and will more likely remember to bring something with them when they set off from home. (Also, you’re encouraging them to get out of the house to see what’s in the gallery today, so you’re helping them get exercise — double win!). If there’s a public walking path very near your home, consider asking permission from the city to site your gallery along that path.
Interior decor

Many people try to make their FLAG look like a real art gallery, with white interior walls, small visitor figurines and benches inside, and putting the art up on mini easels. I like this idea, but be warned folks may take furniture and “patrons” from the gallery. Others have found it tell people which items are intended for exchange and which are fixtures in multiple ways, e.g. both through signage and by labeling the items themselves “Do not take.”
Another approach is to use fixtures that are easily replaced, and just regard them as part of the artwork you supply to the gallery for people to exchange. To help with this, I’ve published instructions and templates to create benches and easels from cardstock. Spectators are a bit more a challenge because they have complex shapes, but I’m working on it.
If you have access to a 3D printer, Markus Dotterweich of Kleinkunstbox Landau has created several round bench designs which you’re free to print for your own use.
Furniture and figurines might get in the way of accessing the art. If you glue them down so they don’t wander off, they can’t be shifted out of the way to allow art to be put in. If the gallery is shallow, this is less of a problem because the entire wall area is easy to reach from above even if there’s stuff on the floor.